Erste Schritte mit easyCMS
Was Ihr easyCMS-Konto enthält, wie Sie sich bei easyCMS Studio anmelden, und die drei Schritte von einem neuen Konto bis zu Ihrem ersten laufenden Bildschirm.
Ihr Konto ist aktiv, sobald Ihre Bestellung abgeschlossen ist. Sie verwalten Ihre Bildschirme in easyCMS Studio unter app.myeasycms.com/studio, auf dem Smartphone, Tablet oder Computer. Diese Anleitung erklärt, was Sie gekauft haben, wie Sie sich anmelden, und die drei Schritte bis zu Ihrem ersten laufenden Bildschirm.
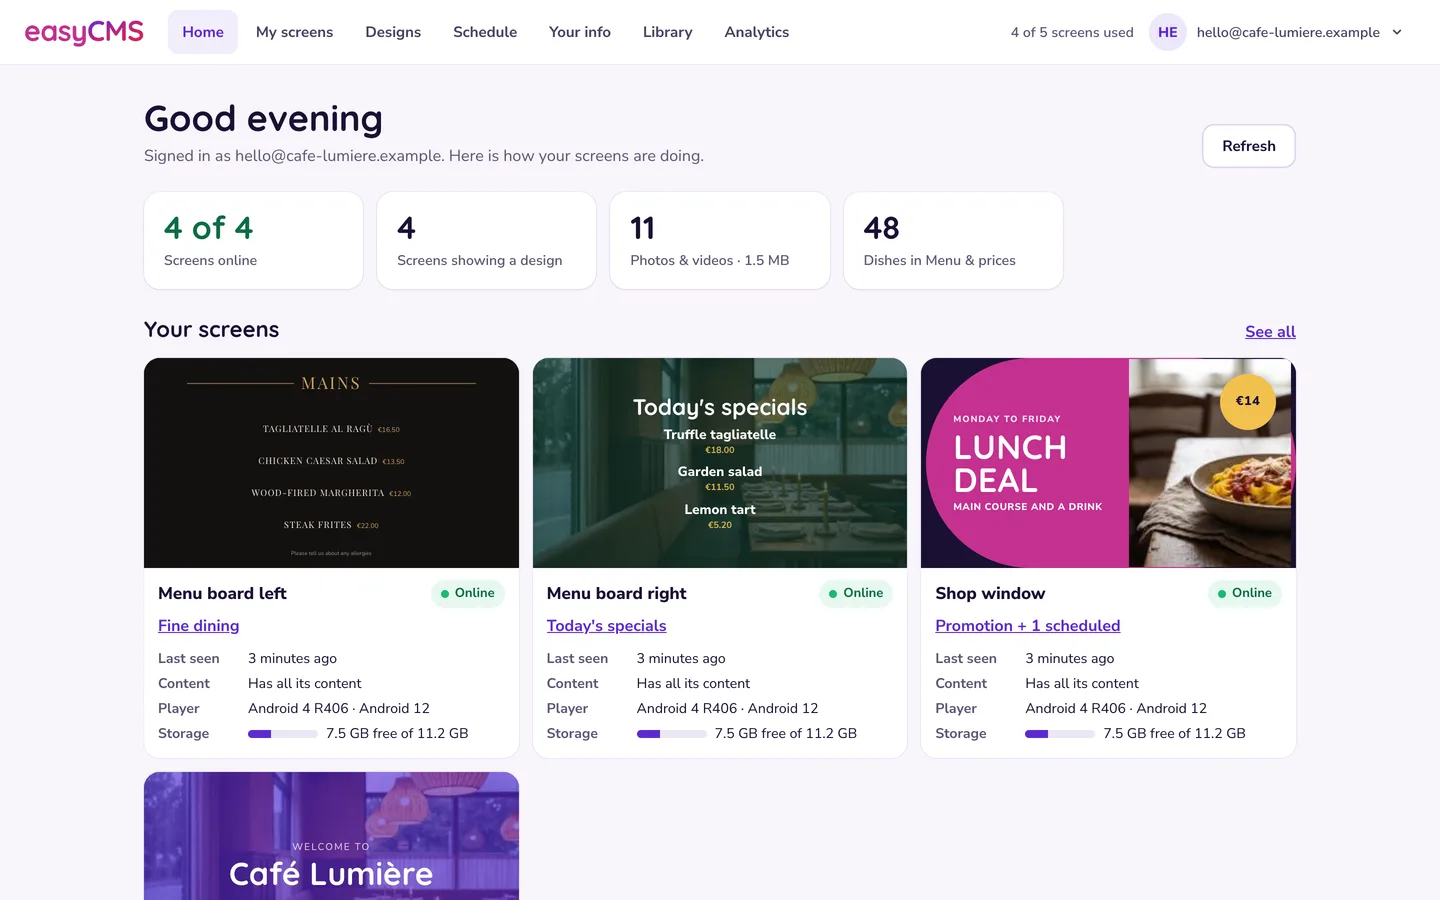 Die Home-Seite von Studio. Jeder Bildschirm, den Sie besitzen, ob er online ist, und ein Bild dessen, was er zeigt.
Bewahren Sie Ihre Willkommens-E-Mail auf Sie enthält Ihren Studio-Benutzernamen und Ihr Passwort sowie die CMS-Adresse und den CMS-Schlüssel, nach denen ein Player fragt, wenn Sie einen Bildschirm verbinden. Verloren? Fragen Sie uns, und wir senden sie erneut.
Was Ihr Konto umfasst
Das Standardkonto kostet einmalig 49€, ohne monatliche Gebühr:
| Enthalten | |
|---|---|
| easyCMS Studio | Mehr als 200 fertige Vorlagen, von uns gehostet und aktualisiert |
| Display-Lizenzen | 1, genug für Ihren ersten Bildschirm |
| Bildschirme | Bis zu 5 |
| Speicher | 1GB für Ihre Fotos und Videos |
Jeder weitere Bildschirm braucht eine Lizenz: einmalig 99€, oder 66€, wenn sie in derselben Bestellung wie das Konto gekauft wird. Für mehr als fünf Bildschirme verwaltet das PRO-Konto (einmalig 299€) bis zu 25 mit 5GB. Eine Lizenz gilt für einen Bildschirm. Alles steht auf der Preisseite.
Bei Studio anmelden
- Öffnen Sie app.myeasycms.com/studio.
- Melden Sie sich mit dem Benutzernamen und Passwort aus Ihrer Willkommens-E-Mail an.
- Beim ersten Mal fragt Studio Wo stehen Ihre Bildschirme? (ein Restaurant, ein Geschäft, ein Büro…). Davon hängt ab, welche Vorlagen Sie zuerst sehen; ausgeblendet wird nie eine. Ändern können Sie das später unter Ihr Unternehmen im Kontomenü.
Tipp Nutzen Sie auf dem Smartphone die Option Zum Startbildschirm hinzufügen Ihres Browsers. Dann ist Studio nur einen Fingertipp entfernt, wie eine App.
Die Seiten, die Sie nutzen werden
Auf dem Smartphone finden Sie diese in einer Tab-Leiste unten.
| Seite | Wofür sie da ist |
|---|---|
| Startseite | Wie es Ihren Bildschirmen geht |
| Meine Bildschirme | Jeder Bildschirm und was er zeigt; Bildschirm hinzufügen verbindet einen neuen |
| Designs | Vorlage wählen, anpassen, abspielen |
| Zeitplan | Was jeder Bildschirm abspielt, und wann |
| Your info | Name des Unternehmens, Logo, Öffnungszeiten, WLAN und Team, einmal eingegeben für alle Designs (Speisekarte & Preise steht bei Gastronomiebetrieben gleich daneben) |
| Mediathek | Ihre Fotos, Videos und Playlists |
| Statistiken | Was wo und wie lange gelaufen ist |
Ihr erster Bildschirm in drei Schritten
- Fügen Sie den Bildschirm hinzu. Installieren Sie den Player und folgen Sie dann Bildschirm hinzufügen in Meine Bildschirme. Siehe Ihr erstes Display verbinden.
- Erstellen Sie ein Design. Tippen Sie in Designs auf Neues Design, wählen Sie eine Vorlage und schreiben Sie Ihre Texte darüber. Siehe Ihr erstes Design.
- Abspielen. Tippen Sie auf Play on…, haken Sie die Bildschirme an, wählen Sie den Zeitpunkt und drücken Sie Send. Siehe Ihr Design auf einen Bildschirm bringen.
Sie können Ihre Angaben ausfüllen und ein Design beginnen, bevor ein Bildschirm verbunden ist: Nichts erreicht einen Bildschirm, bevor Sie es abspielen.
Wie lange eine Änderung dauert
Player laden jede Änderung herunter und spielen sie aus ihrem eigenen Speicher ab. Deshalb laufen Bildschirme weiter, wenn das Internet ausfällt. Eine kleine Änderung kommt in wenigen Augenblicken an; ein großes Video über eine langsame Leitung braucht Minuten. Meine Bildschirme zeigt, wie weit jeder Bildschirm ist: Warten Sie auf „Hat alle Inhalte“, bevor Sie annehmen, dass etwas kaputt ist.
Sie nutzen bereits das klassische easyCMS?
Das klassische easyCMS gibt es weiterhin: Wählen Sie Zum klassischen easyCMS wechseln im Kontomenü von Studio. Dort erstellte Layouts laufen weiter, wo sie eingeplant sind, und die Anleitungen Layouts erstellen und Inhalte einplanen behandeln sie. Soll ein klassisches Layout als Studio-Design neu aufgebaut werden? Fragen Sie uns: Wir machen das kostenlos.
Später weitere Bildschirme hinzufügen
Kaufen Sie eine Lizenz, falls Sie keine freie mehr haben, installieren Sie den Player und nutzen Sie erneut Bildschirm hinzufügen. Siehe ein neues Display hinzufügen.
Wenn sich etwas anders verhält als in dieser Anleitung beschrieben, senden Sie uns eine Support-Anfrage.
Verwandte Artikel: Ihr erstes Display verbinden, Ihr erstes Design, Ihr Design auf einen Bildschirm bringen, Ein neues Display zu Ihrem Konto hinzufügen